About David Townend

David Townend has holidayed at Turkhead for nearly fifty years. He is Managing Director of Applied Technologies Limited www.appliedtech.co.uk A keen racing dinghy enthusiast in the Firefly, Merlin Rocket and Salcombe Yawl fleets for many years and is now racing a 1720 sportboat, encouraged by the keen fleet sailing out of Baltimore.

Alella a new centreboard

When Alella was originally built she had two dagger plates mounted either side of the cabin entrance. Over time I had realised that this was not very efficient going to windward and they had little give when hitting rocks, something we have never done! The issue was for a centreboard not to take up too much space in the cockpit and not block the cabin entrance.

After playing with Autocad for a while I managed to come up with an arrangement that I felt was a good compromise and would be largely unobtrusive in the boat.

I was also keen to use an alloy bronze centreboard having found them very easy to maintain and giving a helping hand to the righting moment whilst sailing Salcombe Yawls. As I did not get any answers when trying to purchase one from Salcombe, I approached Sweetmore Foundry in Stoke on Trent who proved very helpful. I had an old Merlin Rocket centreboard that was modified to create the pattern for the casting and this was duly sent off. A few weeks later a truck turned up with a new alloy bronze centreboard just needing a little fettling and the hinge and tackle holes drilling.

The plate weighs about 70 Kg’s so it had to be lifted with care as it made a real clatter when dropped thankfully missing my toes.

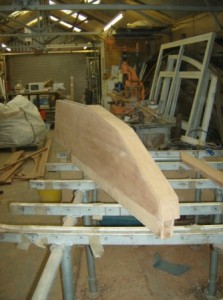
Now I had the centreboard I was able to start building the new case to accommodate it. As I had noted that most of the wood that had perished on Alella was the plywood and the solid wood still seemed ok I decided to construct the new case in solid wood. Boat building friends suggested that ply was better but I was not to be persuaded. Time will tell who is right, although I may not see the result.

I had decided to laminate some tufnol onto the inside to take the wear of the plate being lifted and lowered. I also designed the case so that it would slot through the hog and not leave any end grain exposed. The case sides were made from three planks glued together and packing and capping pieces were also made. Its incredible the ease with which rebates can be cut using a surface router table. Once all the components where made the case was dry assembled to confirm it all worked and that the new plate not only fitted but would raise and lower in the case. At least this gave confidence that the general idea was sound.
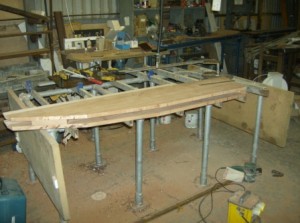
The case lining was glued on first, for this I used all the weights I could find in the shed to increase the pressure on the 2mm sheets of tufnol as they were setting. Having got the tufnol glued on and sanded smooth the main assembly was glued with all the packing pieces and capping timbers. I proved the old adage that you can never have too many clamps and even used some old steel channel sections to help create tight joints.


Once the case was all glued up it was just necessary to trim and sand the case it now looking like a really nice wooden assembly, again I was struck by how satisfying creating something that looks good can be.

Alella hull repairs

Once the hull had been stripped and sanded the repairs could start. There was an area that had obviously leant on a rock at some time with the inner laminates split away. I also noticed that the bilge areas seemed to have taken significant bruising over the years probable from drying on slightly rough ground. I decided that if I fitted bilge rails these would take most of the scrapes and leave the hull better protected.

I also had to prepare the old plate slot holes for re-lamination by routering out a land for the new agba veneer to seated into. To do this accurately I made up some jigs from plastic strips that could be strapped to the hull and guided the router’s outer path thus giving a sharp accurate aperture for the new veneer to fit into.

Once the veneer inserts were shaped to fit the apertures I was able to glue with epoxy resin using micro fibre fillers to ensure a good bond the outer veneer was stapled into the old hull and also packing pieces under lorry straps around the hull increased the pressure on the patches. If I had mastered the technology I might of been tempted to vacuum bag the surface to achieve an even pressure. However I managed to get a reasonably even pressure and only found one slight hollow bit that I was able to fill with a little epoxy filler with a needle through one of the staple holes once they were removed.

Once this was ready it was time to prepare the new hog. When the boat was first built the hog would have had to be planed by hand, all I had to do was pass it over the table mounted router to get accurately rounded corners, so easy if you have the tools to hand.

For fitting the hog it was prepared by drilling and countersinking along its length so that once glued with epoxy resin and filler it could be screwed in place quickly. Starting screwing at the front the new hog slowly pulled up snug against the hull following the rocker of the hull in a smooth curve. The only difficult bit was making sure that the alignment of the hog was correct as a minor error in the first few screws would translate into having to force the timber further on.

The bilge keels were machined to shape and glued on using lorry straps and packing to keep them pressed around the hull until the resin had time to go off and hold them to the hulls curve. Once all the glue was set and straps removed I filleted all the joints using epoxy resin and filler into which I added sanding dust from the transom so that the filler matched the colour of the wood. To get a nice smooth surface on the fillet I had to enjoy an ice lolly just to get the stick!

Alella already was starting to look much better. It was difficult not to just look at her and dream of sailing around the islands. However there was much work to do and time was marching by as it was now mid September, the plan to be finished by Christmas was looking tight.

Alella a new transom

As already mentioned upon my return to the UK the transom fell out after the most minor of taps. On reflection this was not surprising as over the years it had taken some bashings. The first that I remember was while the boat was being trailed in the UK, I think to Anglesey but am not sure, my father stopped by some narrow bridge and then there was an almighty bang. The car behind had not stopped and his big spotlight had cut an almost round hole in the transom. I think the trailer was bent a little as well. The hole was repaired with copious amounts of glue and this lasted for years. Some time later as this was not very attractive a new marine ply transom was fitted, and this was the one that I knocked out.

I had decided to make the transom slightly thicker as I had noted that the vibration of the motor had almost shaken the rear of the boat to bits. For Alella’s first 30 years it was almost unheard of to even carry an outboard, I can testify to this with memories of having had to crawl over the rocks by moonlight to pull the boat up the channel against the tide but that is a story for another time. Thus this damage had been done when my parents, by then in their 70’s had used the boat under engine much more. I therefore designed the transom to be much stronger and easily capable of shipping an outboard so if this use was required again then she was ready.

After checking the old transom as a template and measuring the angles of the hull I realised that I could easily router a rebate on the mahogany transom to fit the hull so that the transom would cover the aft end of the hull laminates. This was done using a 16 degree dovetail router which proved to give a nice land for the hull to sit onto when assembled. So I glued three bits of wood together, sanded the assembly flat and cut out the rough shape. The routering was done and I ended up with something that looked like a transom.

Once I had got the blank I drilled a couple of drainage holes for the rear deck which were lined with tufnol so that they could double as mooring fairleads and tufnol outboard mounting blocks were machined and glued and screwed into place on both the inside and outside of the transom.

This was perhaps the first serious woodwork I had done for a while and I was really pleased that it came out so well, I had forgotten how much enjoyment came from creating an object from bits of wood. This was despite the absolute terror when routering the rebate that something would slip and leave a great gouge across the inside. I think this joy of working with wood also started to influence my ideas for the rear compartment hatch which suddenly was to be laminated at all sorts of strange angles.  More of this in later posts.

Alella preparing for rebuild

The first stage of the rebuild was to get the hull stripped of old varnish, the cabin removed and to repair old damage and rot.

The hull was stripped using both Nitromors stripper and a heat gun and scraper, it is difficult to be sure which method worked best. In some areas the stripper method worked well even if it needed to have repeated several times to overcome the very old varnish layers. Both methods are not ideal as using the stripper one is always concerned that all traces are washed away before repainting and I was especially concerned of stripper lodging in cracks. This part of the work is non very pleasant and always takes much more time than anticipated. Working with the heat gun also needs care so as not to burn the underlying wood whilst still getting the varnish to bubble and be ready to scrape off. Keeping the scraper sharp also proved to important in getting a good result.

The original hog was removed, this was very easy as along most of its length you could see gaps between the hull and the hog. This allowed me to prepare the hull for a new hog that would be glued and screwed into position.

Once the old varnish had been removed it was time for sanding, for this I used a Bosch vibrating orbital sander which with about 120 grit paper cleaned up the hull relatively easily.

The cabin was removed as I had decided to change the boat from twin bilge dagger boards to a centreboard. The boat had never sailed to windward well which led to much frustration as all our family raced dinghy’s extensively so liked a boat with a good sailing performance. I felt that the original reasons for the twin dagger board configuration namely removing the centreboard case to give more space in the cockpit could be largely overcome within the original design framework. Calculations showed that the mast would have to move forward 100mm (closer to the original Fairey Falcon position) to keep the sailing balance. The slight reduction in cabin space was not considered a problem as the cabin was used mostly for dry storage rather than sleeping quarters for three boys. As it turns out there is still space for two adults to sleep in the cabin but it’s not quite the Ritz.

All of this work meant that I had to prepare the old dagger plate slots in the hull to be re-laminated using new Agba veneer. This was done by carefully routering back in steps an area around the slots to allow new veneer patches to be built up with a good overlap for each patch to ensure the repaired hull was as strong as the original.

I was staggered to realise that this preparation work had taken six weeks. It does not seem much when you look at how little the boat seemed to change.  It was also amazing that after nearly 50 years the hull was in such good condition. There was softness in some areas such as around the old bilge keel slots and even some evidence of worms. As these areas were being re-laminated this was not a problem and for the few other areas a good coat of epoxy resin would soak in and make these bits as sound as the rest.

Alella Original 1962 build

Alella was built in 1962 on the drive of our home in Wolverhampton by my father Gordon Townend. He must of had the patience of a saint to put up with the help from his three young sons!

I can just about remember the bare Fairey Falcon hot moulded hull arriving wrapped in a big polythene bag after being trailed up from Fairey Marine in Hampshire. Most of my other memories are fairly vauge other than the cabin being cold laminated using Aerolight glue on the kitchen table. Families especially my mother must have been very accommodating in those days. One old memory that I can still remember was the smell of the hardener which was pretty much an acid the way it fizzed when spilt on the garage floor.

I can not remember the actual sequence of build but appreciate that with hand tools and all the brass bolts that were used in the build that it must have been very painstaking and hard work. It is only much later after I rebuilt the boat in a workshop with band saws, mitre saws, router tables and under-clamping assembly tables do I truly appreciate the skill and effort that went into the original build.

One notable element in the build is the galvanised steel beam that supports the cabin and all the mast loads. This was still in good condition when I rebuilt the boat in 2009 so all I had to do was wire brush and repaint with a good structural steel zinc rich paint to bring it back to looking like new.

Alella rebuild the start

Having arrived back from Ireland in mid July full of enthusiasm for getting Alella rebuilt and back on the water I started to poke around a little to try and ascertain just how much work was needed. The first thing I did was tap the transom which promptly fell off – how it had not fallen off whilst being towed I still do not understand. This was put to one side as it would make the basis of the template to machine a new one.

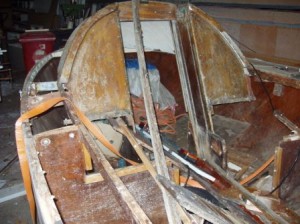
Side deck removed showing cabin rot

I at first thought that I could get someone to do the rebuild for me but after two boat repairers looked at the state of the boat they disappeared never to be heard from again. It was at this stage I had the fateful thought “If my father could build the boat on the front drive why could I not do the rebuild in my evenings and weekends” I think the phrase “Simples” current at that time also got in the way of rational thought.

So I started to plan, the decks would need to come off, the cabin removed and then the hull stripped of varnish. The hog would need to be removed and replaced. I had also thought that the two bilge keel dagger plates originally used should be replaced with a centreboard similar to the ones I had on my old Salcombe Yawl http://www.syoa.co.uk

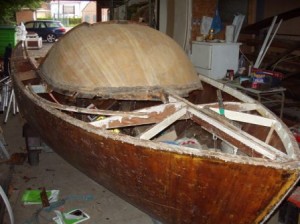
The foredeck was removed and all the rotten timbers striped away. The wood removed made good kindling for the fire at home. After sanding the cabin looked in remarkably good shape except around the bottom edge where it had joined the deck.

Thus the stage was set and we embarked on the rebuild which proved to be an interesting time. The amount of work involved exceeded my estimation and then some. I still can not quite work out how my father built the boat with only basic hand tools and without the use of epoxy systems. My admiration for his skills greatly increased the more I got into the project.

I prepared some drawings based on the original Fairy Falcon Association leaflet and measurements taken from the boat. After a little work I was able to estimate the timber that would be required and got an order off to Robbins Timber in Bristol. http://www.robbins.co.uk  Robbins were very helpful and duly delivered the planed timber and marine ply ready for the reconstruction to begin.

Alella – A Brief introduction

Alella has been associated with Turkhead since the early 60’s. She was built in 1962 by Gordon Townend who used a Fairey Marine Falcon hot moulded hull and built the interior and its distinctive wooden cuddy on the drive whilst three wild youngsters (my brothers and I) got upto various mischief.

At this time our family had started to holiday in West Cork and Alella was taken over on the Innisfallen ferry as she was ideally suited to sailing around the Carbery’s Isles. We sailed around the islands on her in the days before ribs and high powered speedboats. Alella proved to be a very safe and ideal sailing boat for the fantastic sailing area that is Roaring Water Bay. After nearly 50 years and not enough maintenance she was in a sorry state. Not sailed since the start of the new millennium she was lying in a barn quietly gathering dust.

Then on a fine July day in 2009 we took the punt out to Middle Calf, a really beautiful island. On the way we stopped to see the seals off the Tourane rocks. This idyllic day was spoilt for me by the noise and vibration of the outboard. Memories of quietly sailing around the islands in peace and harmony with the surroundings flooded back for me.

When I got back to Turkhead that evening I slipped out to the barn to see Alella under her cover. She was in a rather sorry state. However a “Baldrick” type plan was forming to rebuild her, but was it sensible?


Alella leaving barn for rebuild


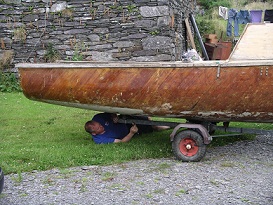
So after dragging an old trailer out of the brambles and getting the local engineers in Skibbereen to fit new bearings there was half a chance that we could get the boat back to the UK for a refit. The boat was loaded onto the trailer and readied for her return. My mother took many photographs perhaps thinking that this was the last she would see of the boat.


Ready to return to UK

After an uneventful drive back to the Midlands, Alella awaited the start of her rebuild. At this stage none of us knew what was in store. Over the next few weeks I will record the story of how Alella was rebuilt and came to sail around the islands in West Cork again.